Tuesday, December 04, 2007

The Great Thanksgiving Weekend Floor Flood

So the floors were finished and totally gorgeous, the trim work was going in and we were looking at being finished in another week or two. That was where we were the Wednesday before Thanksgiving.

Since we could not get away for Turkey Day, we spent the weekend puttering around the house, putting face plates on the electrical outlets and switches, and generally enjoying the house and the great weather. Until Sunday, that is.

I was moving slow and posting forum messages about how great the floor looked, so Ralph went over to the house first. He came back upset, "There is a leak and the bedroom floor is RUINED!"

I told him where to turn the water off to the house and ran over. Here's what I saw:

Left: The paper that had been protecting the new floor was wet and you could see that the floor was no longer flat.

Below: Water was flowing out of the exterior door to the bedroom!


Left: Here is the source of the problem - obviously there had been a leak at this location. The wood had buckled so much it had broken the baseboard.

Below: Mike, the contractor, checking out the source of the problem.


Below: Mike and Damon the Floor Guy checking out the damage. In these two photos you can see the extent of the damage to the floor. The entire room had been soaked with water.


The source of the problem. The trim carpenter forgot that this was a "wet" wall and used long nails to tack up the baseboard. He managed to catch the pipe twice. The one still in the joint was not really the big problem. The one that pulled out when the floor buckled was the serious problem since it let the water leak turn major.


And here was where we were by noon on Monday. Depressing, isn't it? For comparison, here is what the floor looked like before the weekend:

Kitchen is basically finished

Here's my mostly IKEA kitchen:


Lower open shelves are custom built from red oak. They match better than is shown in the pictures. They will stay open and have adjustable shelves in them.


I particularly love the backsplash. Most of it is Georgia white marble salvaged from the old Florida Capitol Building when it was restored to the 1905 version. But the part behind the cooktop is a photo montage of our farm with our favorite horses.


Cabinets: Ikea Tidaholm oak & custom built open shelves
Counters: Crossville Color Blox Two "I've Got the Blues"
Floor: Daltile French Quarter Cobblestone (18") & Bourbon Street (6")
Backsplash: salvaged Georgia (Alabama?) white marble & custom printed image on Italian tumbled marble
Sink: IKEA Domsjo sink
Faucet: Prestige Sonora in oil rubbed bronze
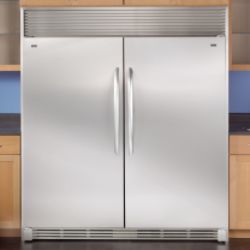
Fridge/Freezer: Kenmore Elite (Frigidaire Twins)
Cooktop: IKEA (Whirlpool)
Vent Hood: IKEA (Whirlpool)
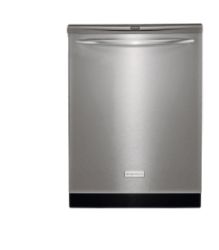
Dishwasher: Frigidaire
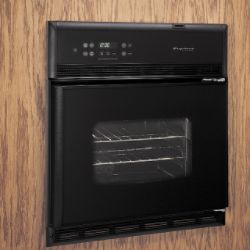
Oven: Frigidaire side opening convection
Paint: SW Meditative

Progress on the house is slow

OK, so I haven't posted here in a long time. August and September, I was busy assembling IKEA cabinets for the kitchen and the bathrooms and other places. October I had jury duty which wore out my knees and I've simply been tired from the pain.

But the house has been progressing - slowly. Trim has been going in, replacement doors had to ordered then re-ordered (first ones were wrong, second ones were wrong, one was broken, etc.)

The pine floors turned out gorgeous! We went with Waterlox with Minwax Ipswich Pine stain and with a satin finish. Here's what they looked like along the way:


Unfinished floor in the living room


First coat of Waterlox Sealer/Finisher with stain mixed in.


First coat in bedroom after the layer dried.


Floor in the bedroom with a couple of coats of Waterlox.


Stairs with two coats, last coat still wet.


Finished floor in the bedroom.


Finished floor in living room with last coat still wet.


It all looks awesome, doesn't it? More to come.....

Thursday, July 19, 2007

Waterlox finish for our floors

I've decided to do a Waterlox finish on our pine floors. Despite the name, Waterlox is NOT a waterbased finish. Instead, it is a modified tung oil finish that gives more of that old floor look. And to add to that old floor look, I wanted to stain the floors to deepen the color right away.

Here are my tests on some scraps of Southern yellow pine similar to what I want for my floors. This first picture shows various stains and for contrast I also put in the piece that we tested 100% pure tung oil and dark tung oil on.


From left to right:
  • Top, dark tung oil; bottom, 100% pure tung oil
  • Top, Sherwin Williams Golden Oak stain applied before any Waterlox; bottom, no stain - entire board finished with Water Lox Original Sealer/Finisher
  • Top, SW Golden Oak stain mixed with first coat of Waterlox; bottom no stain - entire board 2 coats Sealer/Finisher, 2 coats Satin Waterlox
  • Top, Minwax Golden Oak stain mixed with first coat of Waterlox; bottom, Minwax Puritan Pine stain mixes with first coat - entire board 2 coats Sealer/Finisher, 2 coats Satin Waterlox
  • Top, Minwax Special Walnut stain mixed with first coat of Waterlox; bottom, Minwax Early Amercian stain mixed with first coat of Waterlox - entire board 2 coats Sealer/Finisher, 2 coats Satin Waterlox

Same order for this bottom picture but it shows the sheen better. The 100% tung oil (with about 5-6 coats) actually has a pretty good sheen to it, but really is not as shiny as it seems in this picture. Though it does not look like the light is going across the satin finished boards, it is - they just do not reflec the light as much.


In case it is confusing, the first board was done completely with pure tung oil. The second board has stain on one end followed by 4 coats of Waterlox Original Sealer/Finisher. The rest have 1 coat of Sealer/Finisher mixed with stain (where they are stained), followed by 2 coats of Waterlox Original Sealer/Finisher, followed by 2 coats of Waterlox Satin. The tests with straight SW stain versus SW stain mixed with the first coat show that mixing the stain makes it about half as dark as applying the stain directly.

We have decided to stain with half Minwax Golden Oak and half Early American and to finish with 2 coats of Satin.

Monday, July 02, 2007

How about these arches?


A while back I talked Ralph out of the Craftsman style tapered columns on brick piers, but we both wanted something to make the front of the house look less boxy.


The framers made some sample arches and we liked this shape best. Then I photoshopped it to repeat across the front of the house and added the trim color. So how about these arches?

Sunday, July 01, 2007

Lots of Progress!

Wow! I did not realize it had been so long since I had posted on my blog!
There has been lots of progress on the house - in fact we are on the downhill side now that the exterior is nearly finished. The roof was completed last week, the final window went in Thursday so the siding was finished, too. These pictures were taken before that happened:

The front of the house, which faces north


Here is a view from the northwest side - you can see the patch where the window was missing.


Here is a view from the northeast - oh, that is the front door waiting to be reinstalled - another messup on the door & window order.


Here the how it looks from the south side. The little bump is the top of the stairs - it had to be added to give head space for the landing.

Monday, April 30, 2007

Photos of the house build

Since I am in the mode of taking lots of photos, but not in writing about them, here is a link to the house build photo pages at my web site. There are tons of photos there which will be updated at irregular intervals.

Saturday, April 21, 2007

Appliances picked - almost

Today we went in to check out a sale at Sears and ended up buying most of our appliances.

The winners are:

Kenmore Elite All Refrigerator and All Freezer pair. They are the same as the Frigidaire Twins, just rebranded for Sears.


Frigidaire 27 in. Electric Single Self-Clean Convection Wall Oven. This model has a side opening door which will make getting large trays out much easier.


A really cool Frigidaire stainless steel dishwasher:


I've also picked a couple of Ikea appliances. They are made by Whirlpool so they are not exotic European imports.

ELDIG cooktop:


LUFTIG telescoping hood:


The trick here is that the appliances from Sears were 20% off, then it turned out that there are additional rebates from Frigidaire! And the appliances from Ikea get me into their discount of 10% off the kitchen cabinets I was going to buy from them anyway. And every one is about what I wanted for my appliances anyway, so I am very happy getting the discounts.

Sunday, April 08, 2007

Revised Kitchen plan

I've revised the plan for the "Prep" wall in the kitchen. Mostly I changed the upper cabinets and the drawers in the cabinet that will hold all the flatware.

I've started a new kitchen blog over on the IkeaFans Forum since my kitchen is all Ikea cabinets and the people over there will be interested in the modifications I
will be doing. So I will be linking to images here and writing descriptions there.

Tuesday, April 03, 2007

Excavation and forms!

First day of excavating - March 29, 2007


Second day of excavating - March 30, 2007


First day of concrete forms - April 3, 2007


Another shot of the forms on the same day.
Here is the kitchen plan - some of the cabinets are a little off in their locations. This was done with the Ikea Kitchen Planner which is very buggy and not easy to use.


This is the wall to the left as you are looking at the kitchen, then the sink wall at the end, followed by the cooking wall which will be to the right of the sink wall.


Tidaholm oak is the style Ikea cabinet door I'm using. I'll be using the dark metal pulls to the left rather than little handles. The blue tile will be my countertop.

Below is the French Quarter Cobblestone tile for the floor.


Here is the Ikea Domsjo farm sink and the Premier Sonoma faucet for the kitchen.

House elevations